What’s new at Inera and around the industry
July/August 2021 Newsletter
Mark your calendar for XUG 2021!
![]()
The 17th annual eXtyles User Group Meeting (#XUG2021) will take place online on October 25 and 26!
This year’s program will once again run over two half-days (Monday afternoon and Tuesday morning Eastern time) and will feature talks from Inera staff and guest speakers including:
- an overview of the newly released JATS 1.3 update from Debbie Lapeyre of Mulberry Technologies
- updates on Inera development projects
- presentations from Inera customers and the Inera team
- informal breakout rooms
- and more!
Registration will open in early September, so stay tuned!
Edifix + Cabells: Some updated results
There’s still time to try out our new Cabells Reference Checking feature during the open beta phase!
Here’s what Edifix + Cabells has been up to since we launched the feature in May:
- A total of 295 live Edifix jobs had at least 1 reference flagged as published in a journal that appears in Cabells Predatory Reports
- Of those 295 jobs, 66 had more than 1 reference flagged
- These 295 jobs contained a total of 12,991 references, of which Edifix was able to fully process 11,658
Over the same period, we processed a total of 7102 live Edifix jobs (containing 104,140 submitted references, of which Edifix was able to fully process 89,180), meaning that overall, 4% of all live jobs included at least 1 reference flagged by Cabells.
Try it out for yourself on Edifix.com! Edifix subscribers and trial users get full access to Predatory Reports details for free during the open beta.
And check out the latest blog posts from our friends at Cabells: “The top nine questions on predatory journals – answered!” and “No signs of slowing.”
New webinar date!
Our upcoming eXtyles online course, “Wrangling References and Corralling Citations in eXtyles,” has been rescheduled to August 18 from 10:30 to 12:30 Eastern.
Here are some of the topics we’ll cover:
- A refresher on exactly what eXtyles Bibliographic Reference Processing does (and does not do) to your references
- What you need to do (and what you don’t need to do!) with all those colorful character styles eXtyles adds to your reference list
- Best practices for efficient and accurate reprocessing of references and use of Citation Renumbering
- Guidance on how to resolve comments, or maybe even change what comments appear in your documents
- Some reference style choices that may cause Bibliographic Reference Processing to stumble, and why
If you’ve already registered and the new date still works for you, you’re all set! If you haven’t registered yet, you can register here. (If you’ve already registered but can’t make the new date, please email Jo Ripoll to get your registration fee refunded.)
What we’re reading: Displaying retractions, talking about errors, and the myth of fully automated web accessibility
We’re thinking a lot these days about retracted articles and withdrawn preprints, and you may be, too! In this study published as a Research Letter on JAMA Network Open, Elizabeth Suelzer et al. found that the journal websites and bibliographic databases they examined (for publications between 2009 and 2019) “did not consistently display the retracted status of articles.”
“We hope that by making the retraction information more clearly discoverable and standardized,” the authors conclude, “the number of unintentional and unacknowledged citations of retracted literature will be reduced.”
You can also read an interview with Elizabeth Suelzer about this research on the Retraction Watch blog.
Also on Retraction Watch, we recommend this recent post, as well as this one from Spring 2020, about the importance of not only correcting errors in your published work but also discussing the errors and corrections openly.
*
Have you recently been seeing ads for, or had someone recommend to you, a product or service that promises to make your website accessible just by adding a widget or plugin? If so, you should read this article by Anna E. Cook on the UX Collective. The spoiler’s in the title: “There’s no such thing as fully automated web accessibility.”
“Great design is not at odds with accessibility,” Cook writes. “Great design is accessible. … products pitching fully automated accessibility would have you believe otherwise.”
Find Inera at upcoming (online) conferences
 ► ISMTE 2021 Global Virtual Event
October 11-14
Bruce Rosenblum will be speaking at this event on the topic of Best Practices and Considerations for Citing Preprints.
 ► CSE Fall 2021 Virtual Symposium
November 1 & 2
CSE will also be hosting the Short Course for Manuscript Editors on November 5, featuring a unit on Word Tips for Editors with Liz Blake.
Attending one of these events? We’d love to see you—please contact us if you’d like to schedule a meeting.
Word tips: Formatting tricks
ℹ️ Our Word Tips are tested on recent versions of Word for Windows. If you are using Word for Mac, which has a smaller feature set, your mileage may vary.
What’s perfect for summer? A remix of your roving reporter’s favorite formatting tips!
From our June 2017 newsletter, here’s how to clear formatting from a specific character, word, paragraph, or entire document.
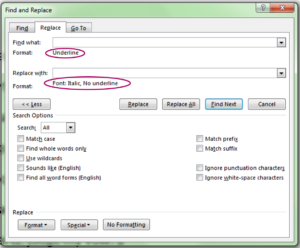
To find and replace formatting, follow these steps:
- Open the Replace dialog box (keyboard shortcut: Ctrl-H).
- Unless you are limiting your search to a specific text string, make sure there is nothing in the Find What: and Replace With: boxes!
- With your cursor in the Find what: box, apply the formatting you want to search for. You can use keyboard shortcuts for face formatting such as bold (Ctrl-B), italics (Ctrl-I), underlining (Ctrl-U), superscript (Ctrl-+), or subscript (Ctrl-=). You can also use the More dropdown to apply face formatting, language, a paragraph or character style, or paragraph-level formatting such as indention.
- With your cursor in the Replace with: box, apply the formatting you want to substitute. (You’ll also need to turn off the formatting you want to replace.)
- Depending on the search, it may be safe to use Replace All, or you may want to replace instances one at a time.
Here’s an example, showing how the Replace dialog looks when you replace underlined text with italic text:
From our February 2019 newsletter, here’s how to select text with similar formatting so that you can make the same formatting changes to all instances at the same time, like this:
To copy and paste formatting from one chunk of text to another, either use the Format Painter button on Word’s Home ribbon (select the text whose format you want to copy, click the button, then click the text you want to reformat), or use the keyboard shortcuts Ctrl-Shift-C to copy formatting and Ctrl-Shift-V to paste it.
→ Bonus Tip: You can use Format Painter multiple times by making it “sticky”! Simply double-click the button to copy formatting, single-click to paste it, and hit Escape to turn it off when you’re done.
You probably know that Word’s Review pane lets you control tracking of content changes and format changes separately, so you can track content changes only. But did you know that you can also accept or reject tracked formatting changes while leaving tracked content changes intact? Here’s how!
- Go to Review > Show Markup and uncheck both Comments and Insertions and Deletions, leaving only Formatting checked:

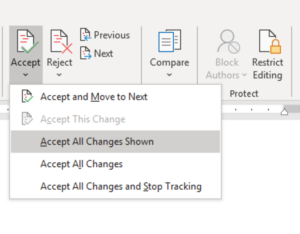
- Go to Review > Accept (or Review > Reject) and choose Accept (or Reject) all changes shown:
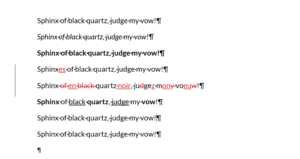
You should now see no tracked changes in your document, even though some of them are still there. - Go to Review > Show Markup and check Insertions and Deletions and whatever other elements you’d like to see tracked. Since you just accepted all the formatting changes, you should now see everything else:
→ Bonus Tip: We’re always on the side of working with nonprinting characters showing, and here’s another reason why: in Word, the humble paragraph mark (¶) holds all your paragraph-level information! If you’ve ever wondered why a font, language, style, or color change didn’t stick, it’s probably because the paragraph mark wasn’t included.
Have an intractable Word problem you’d love to solve? Have a clever tip to share? Send it to us at [email protected] (subject line: Word Tips)!